Security Basics
This image was generated in Photoshop Beta by the Adobe Firefly engine.
Though cybersecurity might not be in your job description, as a systems librarian you will likely be responsible for implementing measures to protect your patrons’ data and your library’s subscription resources against unauthorized access. This lesson will cover the basics you need to know to perform common tasks like requesting security certificates for websites, applying your institution’s user authentication system(s) to services, setting up and troubleshooting off-campus access to resources, and ensuring patron privacy when building custom applications with vendor APIs.
Recording and Materials
Slides (Presented November 14, 2024)
In This lesson
Security Certificates
Kicked off by Tim Berners-Lee’s vision of the World Wide Web, the Hypertext Transfer Protocol (HTTP) was developed through the early 1990s. This protocol allowed clients and servers to communicate to deliver hypertext documents, and it successfully formed the foundation of the modern Internet.
However, these communications were easily decipherable and readable by humans. This left early netizens vulnerable to identity theft and other crimes. Malicious actors who intercepted messages could steal passwords, credit card numbers, and other private information users sent to websites they trusted.
In the late 2010s, Google and Mozilla mandated that all major web browsers require websites to be served over HTTPS by default. HTTPS extends HTTP by adding a layer of encryption, which uses algorithms to disguise messages as meaningless strings of characters. For example, if a user types “password123” into a form, after encryption the message might instead look like “Sjv5a+pZdG/h3v1ON6+RGqAi” until the intended recipient decodes it.
HTTPS uses the Transport Layer Security (TLS) protocol to accomplish this. Early versions of TLS were called Secure Sockets Layer (SSL), hence HTTPS, HTTP over SSL. Though SSL was officially deprecated in 2011, people tend to use the two acronyms interchangeably, and you’ll still see security certificates for website domains referred to as “SSL certificates.”
TLS uses cryptographic keys to scramble data so it can’t be read by bad actors, even if they manage to “sniff” the traffic flowing between clients and servers.
- Clients use a public key in the certificate to encrypt messages sent to a server associated with a domain.
- The received messages can only be decrypted with a private key stored on the real server for that domain. This ensures hackers can’t pose as the owners of a domain by copying its certificate.
- Clients and servers use these two keys to agree on a random session key or shared secret key to secure transmitted data for the duration of that connection only. This type of encryption is faster than using the public/private key pairs, so the two sides can now share large volumes of data both safely and efficiently.
If you’re interested in learning more details, you can read up on TLS handshakes. For the purposes of this course, though, what you’ll likely need to know for your job is how to generate security certificates for your library’s domain(s).
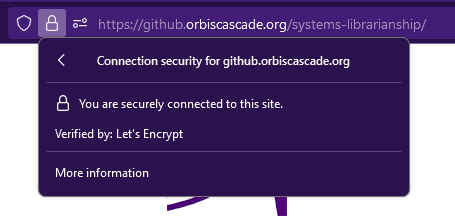
Certificate Authorities (CAs) issue the security certificates for HTTPS. CAs serve as an independent third party, like notaries for legal documents. Notaries are established officials who verify the identities of the parties involved in a contract and witness the signing, so others can be confident the document isn’t fraudulent. Similarly, CAs verify that a person or organization owns a domain and that the digital signatures on this certificate are valid. Modern web browsers show an icon by the omnibar that indicates whether the connection is secure and which CA issued the certificate.
Important note: a valid certificate from a CA does not promise to users that the website itself is trustworthy. It only means the server they’re connecting to is run by the owner of that domain and communications will be private. Criminals can trick users into sharing their data over secure connections with no danger warnings from the browser, such as by purchasing domains deceptively similar to those of well-known companies and mimicking their virtual storefronts.
Your institution may work with a preferred commercial CA like DigiCert, GoDaddy, Sectigo, etc. The non-profit Let’s Encrypt also issues free automated certificates, which is handy for smaller web servers. Regardless which CA you use, the process is standard.
-
A Certificate Signing Request (CSR) must be generated on the machine running the website, along with the public and private keys. The CSR contains the public key and some metadata like the domain to be secured, the owning organization’s name, and contact info. To prove ownership, the CSR is also signed with the private key. If you’re working with a vendor to set up a custom domain for a hosted service, you’ll need to provide the metadata to them, and they’ll generate and sign the CSR.
-
You or your IT department will submit the CSR to a CA. The CA will use the CSR to create the security certificate for the website.
-
The certificate must be installed on the sever, along with any additional certificates specific to the CA.
Security certificates may be issued for a single domain, such as github.orbiscascade.org, or a primary domain plus all first-level subdomains. This is called a wildcard certificate, since it contains a wildcard character (*) in the domain name field. A single wildcard certificate for *.myschool.edu could be used for multiple websites like library.myschool.edu, mail.myschool.edu, canvas.myschool.edu, etc. Ask your IT department if your institution has a wildcard certificate you can apply to new services.
Authentication
Security certificates give assurance to users that the owners of a domain are who they say they are. Now how do you, as a provider of services, ensure that users are who they say they are? By authenticating them using information only they know, and/or physical objects only they possess.
Types
Password-based authentication is the most common and recognizable type. When users create an account in a system, they set a password that ostensibly only they know, and that password is stored encrypted in a database. On subsequent visits, a user proves they are the person who owns that account by providing the same password.
Authenticating based on secret knowledge alone has many weaknesses. People can share their passwords deliberately or carelessly, for example by writing them down on sticky notes visible to anyone who walks by their workstation. They can choose passwords that are easy for others to guess; or get tricked into entering credentials into a fraudulent webform; or use the same common password for multiple systems, so if one is compromised, the hackers gain access to all the others.
Multifactor authentication (MFA) requires more proof of identity to allow users to access protected resources. In addition to knowing their passwords, the users must possess one or more of…
- A token such as a hardware key, electronic fob, or specific smartphone registered to the account.
- A biometric identifier such as a fingerprint or facial features.
- A digital certificate installed on their device.
- Access to a one-time password sent to a known email address or phone number associated with the account.
When implementing systems for an academic library, you won’t likely need to set up any of the above yourself. Instead, you’ll implement one of the following protocols maintained by your IT department, so patrons can access their accounts on the catalog and subscription databases.
Protocols
In the early 1990s, developers at the University of Michigan created the Lightweight Directory Access Protocol (LDAP). When using LDAP for authentication, an application communicates with an enterprise directory to verify a user’s submitted name and password and receive information about that user, like whether they have permission to access a protected resource.
One downside of LDAP is that when users navigate to multiple applications, they must resubmit their credentials for each one to authenticate against the directory. To address this, Shawn Bayern at Yale University developed the Central Authentication Service (CAS) protocol. As in the name, CAS servers “centralize” authentication so users can seamlessly access multiple applications once their client (e.g., a web browser) establishes a single sign-on (SSO) session.
In the CAS model, applications redirect users from protected resources to the CAS server to log in. If a user authenticates successfully, CAS returns them to the application along with a ticket. The application validates the ticket against the CAS server before allowing the user to access its resources. The user’s browser stores a ticket-granting cookie CAS can check on subsequent visits to other protected resources and applications, so the user doesn’t need to retype their password until they log out or close their browser, or the session otherwise expires.
In the 2000s, the nonprofit Organization for the Advancement of Structured Information Standards (OASIS) developed another SSO protocol based on XML, Security Assertion Markup Language (SAML). While LDAP authenticates users against a single enterprise directory, SAML can act as a bridge between multiple service providers (SPs) and identity providers (IdPs). This is now the most common protocol you’ll encounter in higher education for SSO. You may see it referred to as Shibboleth, which is open-source software that implements the SAML protocol.
From a user’s perspective, the process for SAML is similar to CAS. When a user follows the link to sign in to an SP like a library catalog, they get redirected to a SAML login page. After the IdP processes the authentication request, it passes the user and their information back to the catalog. If the catalog matches the information received from the IdP to an active patron account, the user can proceed with placing holds, viewing their current loans and due dates, etc.
Both SPs and IdPs may set session cookies in the user’s browser, with different expiry times. This can lead to breeches of privacy on shared computers. Imagine a patron signs in to the library catalog on a shared computer, like a lookup station in the stacks. After completing their goals, they click “Sign Out.” This destroys the cookies on the catalog side. However, if the session on the IdP side remains active, when a new patron walks up to the same computer and clicks “Sign In,” they’ll see the previous patron’s account! If you discover this behavior on your public stations, contact your IT department to discuss solutions.
Proxies and VPNs
When libraries purchase subscription resources, they almost never provide their patron records for vendors to authenticate individual users. The exception is cloud-based Integrated Library Systems/Library Service Platforms, like Ex Libris Alma or Innovative Interfaces Sierra, which are used specifically to manage user and bibliographic records, circulation of materials, etc.
Instead, vendors typically grant access to their databases and publications through IP authentication. In this setup, libraries provide IP ranges for their campus(es), and the vendors check whether a user has an IP address within those ranges to grant or deny access to their sites. This works perfectly when patrons are physically within the library or a campus computer lab, but if they attempt to use these resources from any other network, visiting the same URLs that worked at school will result in paywalls or errors.
To enable access outside of limited IP ranges, libraries implement proxy servers. Proxies act as an intermediary between clients and servers, so the request that reaches the vendors’ servers comes from an approved location. In 1999 Chris Zagar developed EZproxy, which accomplishes this by rewriting URLs to funnel traffic through a library- or OCLC-owned server. For example, instead of visiting https://www.jstor.com, an off-campus user must visit https://ezproxy.myschool.edu/login?url=https://www.jstor.com, and EZproxy will rewrite all links within JSTOR to also redirect through ezproxy.myschool.edu.
Employees and patrons might also have access to a Virtual Private Network (VPN) when working off-campus. Similar to proxies, VPNs process traffic from a client through a server before sending requests out to the internet, and they can mask the client’s original IP address. The key differences are that VPNs first establish a secure tunnel with clients that encrypts the data sent back and forth, and users must install software on their personal devices to connect.
Institutions may offer different types of connections to their VPNs. Depending on which settings patrons use, they might or might not appear to vendors to have an on-campus IP address.
- A full tunnel connection routes all traffic from the client through the tunnel.
- A split tunnel connection routes some requests through the tunnel, while other requests go directly over the internet. For example, a split tunnel connection may allow access to resources on a school’s local network, while requests to external websites go through the user’s ISP as usual.
Due to these variables, following EZproxy links while connected to a VPN can have unexpected results. See “Why am I getting a database provider sign in screen when using EZroxy and VPN.”
OpenAthens (OA) now offers federated access to popular subscription databases and publications. In this model, libraries set up SAML authentication to an OA server, with the option to respond with anonymized identifiers instead of their patrons’ personally identifying information (PII). Then patrons can use SSO to access content from participating vendors. However, many vendors still offer IP authentication only, so proxies or VPNs are still necessary to access their resources.
API Security
As introduced in the first lesson, APIs can be used to access information from vendor applications. APIs can be very useful and powerful, however, they may allow access to your patrons’ PII and other sensitive data. Some layers of security are built in to APIs, and others you must consider when designing applications to use them.
API Authentication Methods
Though the first lesson introduced APIs with an example from MediaWiki, which is open for anyone to use anonymously, the APIs you’re likely to use as a systems librarian will almost always require some form of authentication for one or more reasons.
- The API is part of a paid service for customers only, such as the OCLC and Ex Libris Alma APIs.
- The API returns personalized and/or sensitive information, such as Google APIs for Gmail and Groups.
- The API needs to limit the number of requests per user per day to avoid overloading servers.
The two most common authentication methods for API calls are API keys and the Open Authorization (OAuth) protocol.
API keys are simple to use. The API provider will issue a unique identifier to you, and you’ll send it with every request in one of two ways:
-
As a query parameter in the URL, e.g.,
https://apis.example.com/path?apikey={your key} -
In the “Authorization” header of the HTTP request, e.g.,
curl -H 'Authorization: Bearer {your key}' https://apis.example.com/path
For additional security, the key may be associated with limited permissions. For example, when using the Ex Libris Developer Network to set up your keys, you’ll specify which APIs this key has access to (Bibliographic Records, Users, etc.) and whether calls made with it may change your records or only read them.
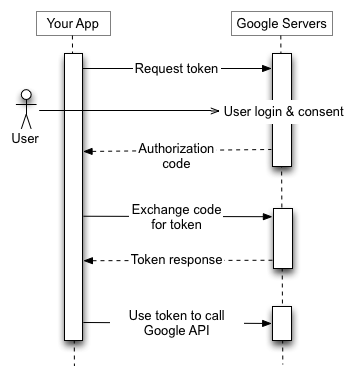
OAuth can be more complicated to set up. Rather than writing a static key into your requests, you’ll need to code your application to obtain an access token from the API server. This step may include logging in to a user account in a browser to authorize the application to access your data. Like with API keys, this access token must be included in every request. However, access tokens will also expire after a period of time, so your application will likely also need to request a refresh token, which will allow it to obtain fresh access tokens automatically without prompting you to log in again.
Here’s an illustration of the process from Google’s documentation:
CORS
By default, web browsers permit scripts to access resources only from the same domain and port. A webpage at myschool.edu may contain a script that asynchronously fetches the output of myschool.edu/library/myapp.php, but that same script would fail if it were placed on a webpage at anotherschool.edu. This is called the same-origin policy. The same-origin policy applies only to JavaScript, not to other types of resources on a webpage like images, or to requests made directly by web servers through methods like cURL.
Cross-origin resource sharing (CORS) is a mechanism that allows or restricts JavaScript access across domains. APIs define their CORS policies to allow broad access from all domains, or only specific known domains, or no external domains at all. To allow any webpage in the world to call myapp.php through JavaScript, the developer could put this code at the top of the file:
<?php header("Access-Control-Allow-Origin: *"); ?>
An API’s documentation should specify whether its methods are open through CORS or not. For example, the Ex Libris APIs support CORS for the Analytics API, but none of their other APIs. This means Analytics reports can be fetched with JavaScript functions on a webpage, but utilizing any other Alma or Primo API requires a server-side application. However, though it’s technically allowed, using JavaScript to access the Analytics API poses security risks, as explained below.
Application Design
Even when APIs have strict authentication and access requirements, it’s possible to introduce security holes through application design.
Let’s say you’d like to use the Ex Libris Analytics API to display the results of a report on a webpage. This API is open through CORS, so you could simply place a jQuery function on the webpage like this:
$(document).ready(function () {
    var url = 'https://api-na.hosted.exlibrisgroup.com/almaws/v1/analytics/reports';
    var report_path = '%2Fshared%2Fmypath%2Fmyreport';
    var api_key = 'abcd1234';
    $.get(
        url + '?path=' + report_path + '&apikey=' + api_key,
        function(data) {
            $('#results').html(data);
        }
    );
});
If you followed along in the first lesson, you’ve seen for yourself that:
- All JavaScript is visible to users in the source of the webpage.
- When this function executes, the Network tab of the browser tools will display the request and all of the included URL parameters.
If this function were placed on a real webpage, the API key would be exposed for anyone to take and use to access your library’s shared Analytics reports! The safer method is to write a server-side application that submits the request to the Analytics API, and to call that application in your JavaScript function instead, as described in this Tech Blog post: “Using a simple proxy to add CORS support to Ex Libris APIs”.
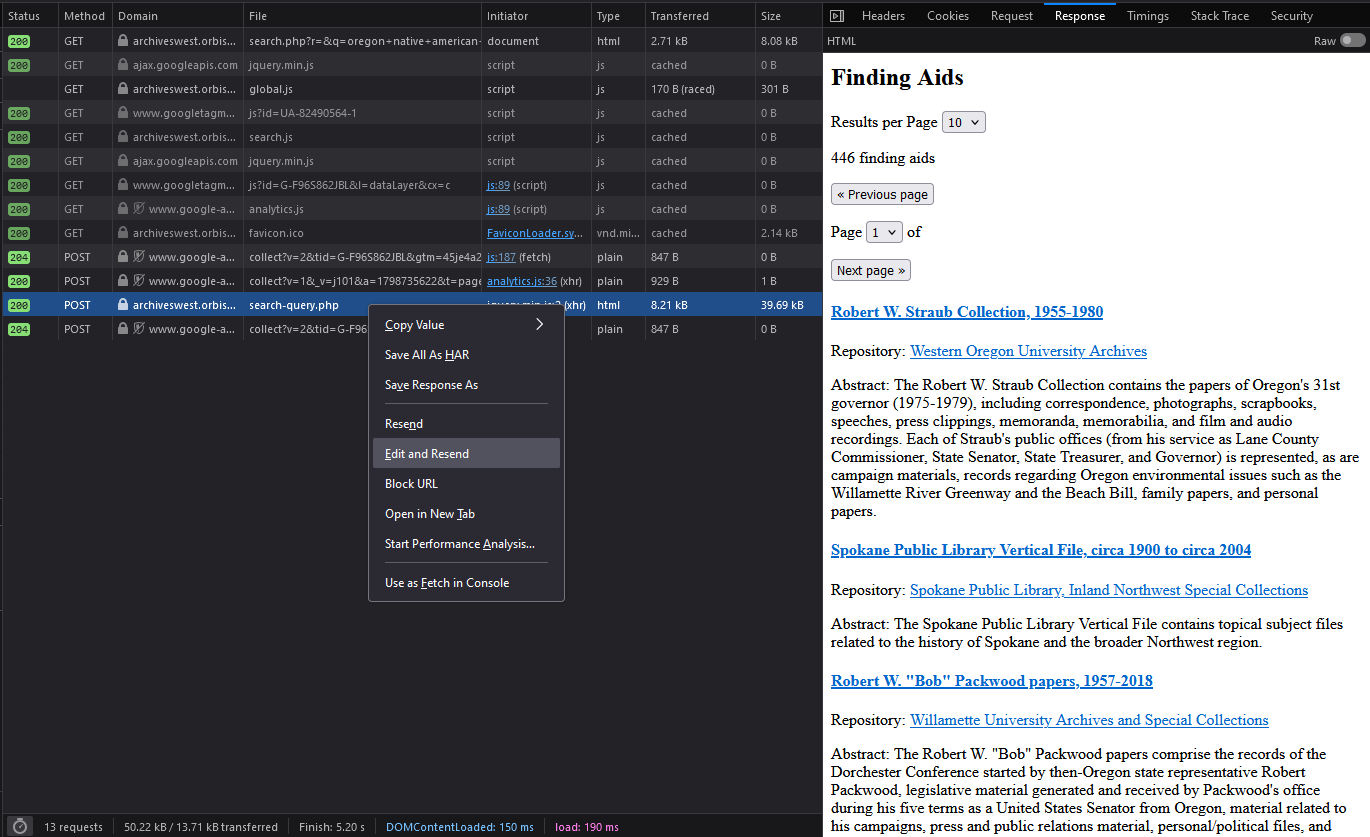
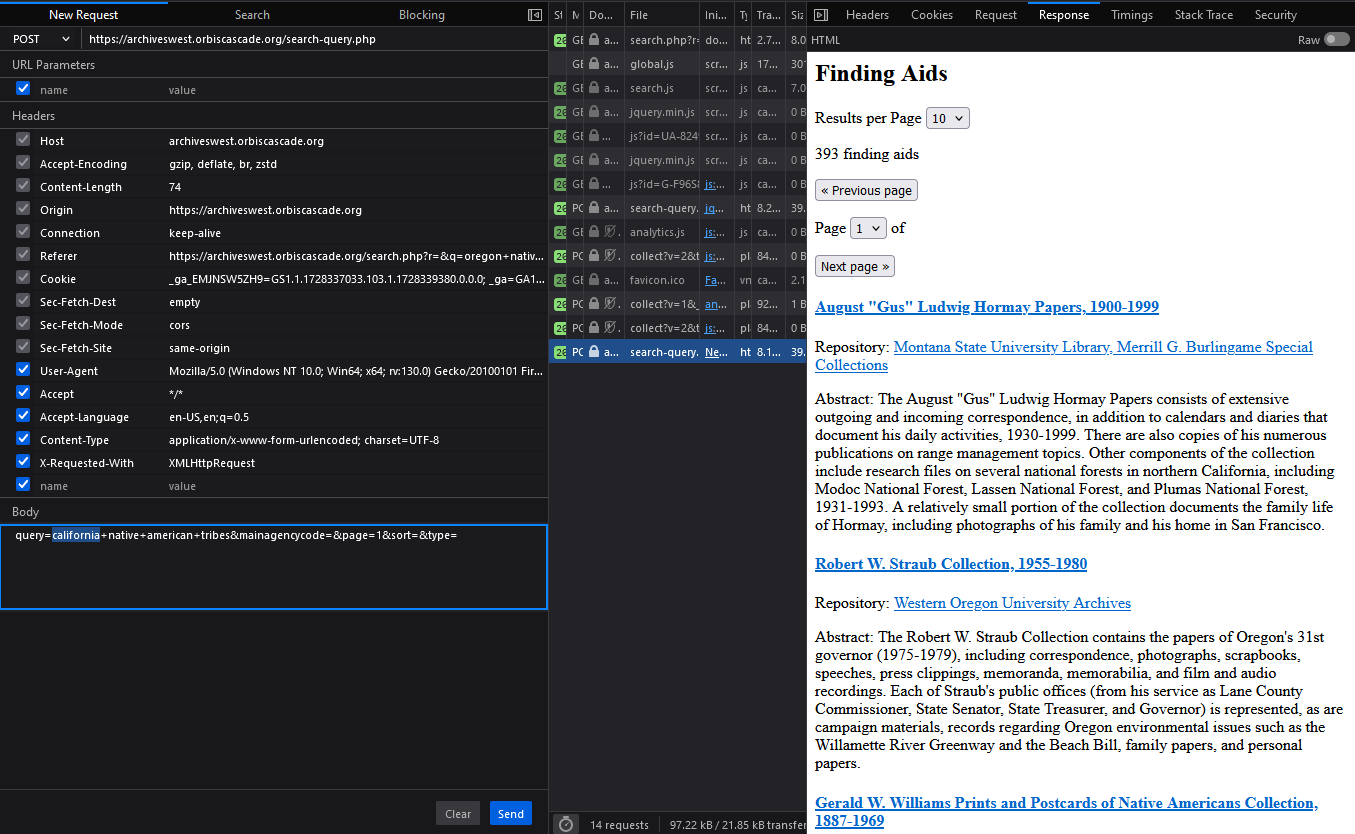
If you’ve been especially adventurous in testing out browser tools, you might have discovered that the Network tab can also be used to tamper with requests. In Firefox and Edge, simply right-click and select “Edit and Resend” to play with the parameters. In Chrome, you can copy the request as a “fetch” command and edit anything in it before rerunning. Here’s an innocuous example of changing an Archives West POST query from “oregon native american tribes” to “california native american tribes.” You can click the images to see them at their original resolutions.
Now let’s say you’re using the ILLiad Web Platform API to display a patron’s interlibrary loan activity on a student portal. Atlas’s documentation shows this example to return the top ten active requests for the user “jdoe”:
GET /ILLiadWebPlatform/Transaction/UserRequests/jdoe?$top=10 HTTP/1.1
Host: your.illiad.edu
ApiKey: ABC123
Accept: application/json
You ensure the student portal is secure by requiring authentication through your school’s SSO. You ensure the key is kept secret by using a PHP script to construct the call to the API, not a JavaScript function anyone can see.
Then you get the logged-in patron’s username from the portal and pass it to your script like this: myschool.edu/library/illiad-requests.php?user=jdoe
Because browser tools can be used to edit and resend requests, a student could now substitute any of their classmates’ usernames for “jdoe” to see a list of their requests through your application!
Would anyone care enough about other people’s ILL requests to do that? Maybe not, but it illustrates the importance of answering these questions during development:
- What information do you need to pass to an API, and is it sensitive?
- What information is returned by the API, and is it sensitive?
- Where and to whom could any of this information be visible?


